

Essentials for Android Application Development
Preparing for the Android exam requires a comprehensive set of notes to cover the diverse topics of this dynamic platform. From understanding the fundamentals of Android architecture, activities, and fragments to mastering the intricacies of handling UI elements, data storage, and networking, these notes serve as a valuable resource for success. Additionally, grasping essential concepts like intents, services, and background processing is crucial. With a strong focus on Android development tools, debugging techniques, and deployment strategies, these exam notes become a reliable guide to navigating the challenges of the Android exam. Armed with a well-organized and detailed set of notes, aspiring Android developers can approach the exam with confidence, knowing they have a comprehensive understanding of this powerful mobile ecosystem.
Tags in android manifest file by arshil
| Tag | Description |
|---|---|
<manifest> | The root element of the Android Manifest file. It contains metadata about the application such as package name, version information, permissions required, and components (activities, services, etc.) present in the application. |
<application> | Represents the application and contains elements related to the overall application configuration. It includes attributes such as the application name, icon, theme, activities, services, content providers, and broadcast receivers that make up the application. |
<activity> | Defines an activity, which represents a single screen with a user interface. It specifies various attributes such as the activity name, label, theme, intent filters, and launch mode. Activities are the building blocks of an Android application and are used to interact with the user. |
<service> | Describes a service, which is a background component that performs long-running operations or provides functionality to other applications. It defines attributes such as the service name, process priority, and intent filters. Services run independently of the UI and can perform tasks even when the application is not visible. |
<receiver> | Represents a broadcast receiver, which is responsible for receiving and reacting to broadcast messages sent by the system or other applications. It defines attributes such as the receiver name and intent filters to specify the types of broadcasts it can handle. |
<provider> | Defines a content provider, which manages a shared set of application data that can be accessed by other applications. It specifies attributes such as the provider authority, data types supported, and access permissions. Content providers facilitate data sharing between applications. |
<intent-filter> | Specifies the types of intents that an activity, service, or receiver can respond to. It contains elements such as <action>, <category>, and <data> to define the conditions under which the component should be launched or respond to specific intents. |
<permission> | Declares a custom permission that can be used to restrict access to certain features or data within the application. Permissions are used to enhance security by allowing or denying access to protected resources. |
<uses-permission> | Indicates the permissions required by the application to access specific features or data on the device. These permissions are declared by the Android system or other applications and are necessary to ensure proper functioning of the application. |
<?xml version="1.0" encoding="utf-8"?>
<!-- Manifest tag (root element) -->
<manifest xmlns:android="http://schemas.android.com/apk/res/android"
    xmlns:tools="http://schemas.android.com/tools">
    <!-- Application element (contains app related data and sub tags) -->
    <application
        android:allowBackup="true"
        android:dataExtractionRules="@xml/data_extraction_rules"
        android:fullBackupContent="@xml/backup_rules"
        android:icon="@drawable/creator"
        android:label="@string/app_name"
        android:roundIcon="@drawable/creator"
        android:supportsRtl="true"
        android:theme="@style/Theme.ExamPracticeProject"
        tools:targetApi="31">
        <!--activity tag (consists activity related info [which to start first main etc...]) -->
        <activity
            android:name=".MainActivity"
            android:exported="true">
            <!-- Intent filter (consists info about intents and name action and category tag) -->
            <intent-filter>
                <action android:name="android.intent.action.MAIN" />
                <category android:name="android.intent.category.LAUNCHER" />
            </intent-filter>
            <meta-data
                android:name="android.app.lib_name"
                android:value="" />
        </activity>
        <!-- service tag (Derives background services) -->
        <service android:name=".MainActivity"/>
        <!-- State provider (like redux) -->
        <provider
            android:authorities="app/"
            android:name="android.app.slice.SliceProvider"
            >
            <intent-filter>
                <action android:name="android.intent.action.AIRPLANE_MODE"/>
                <category android:name="android.intent.category.APP_FILES"/>
            </intent-filter>

        </provider>
    </application>
    <!-- Defines permission for app usage -->
    <uses-permission android:name="android.permission.READ_CONTACTS"/>
</manifest>
Android Virtual Device (AVD)
AVD stands for Android Virtual Device. It is an emulator that allows you to simulate and test Android applications on your computer without the need for a physical device. AVD provides a virtual environment that replicates the behavior and characteristics of an Android device.
To set up an AVD in Android, you can follow these steps:
Open Android Studio:Launch Android Studio, which is the official integrated development environment (IDE) for Android app development.
Open AVD Manager: Go to the
"Welcome to Android Studio"window or select"File"from the top menu and choose"Settings"(on Windows) or"Preferences"(on macOS). In the settings/preferences dialog, navigate to"Appearance & Behavior" > "System Settings" > "Android SDK". Click on the "SDK Tools"tab and then click on the "SDK Manager" button. The Android SDK Manager window will open.Install System Image: In the SDK Manager, select the
"SDK Platforms"tab. Here, you can choose the Android versions for which you want to create AVDs. Select the desired Android version and click on the"Apply"or"OK"button to install the required system image.Open AVD Manager: After installing the system image, go to the "SDK Tools" tab in the Android SDK Manager. Check the
"Android Virtual Device (AVD) Manager"checkbox and click on"Apply"or"OK"to install the AVD Manager.Create a New Virtual Device: Once the AVD Manager is installed, you can open it by clicking on the
"AVD Manager"icon in the toolbar or by selecting"Tools" > "AVD Manager"from the top menu.Click on
"Create Virtual Device": In the AVD Manager, click on the "Create Virtual Device" button to start creating a new virtual device.Choose Device Configuration: Select a device definition that matches the characteristics of the virtual device you want to create. You can choose from various pre-configured device profiles, such as Nexus devices, Pixel devices, or Android TV devices. Alternatively, you can create a custom device configuration by specifying the device screen size, resolution, RAM, and other hardware settings.
Select System Image: Choose a system image for the selected device. The system image represents the Android version you want to emulate. Select the installed system image that corresponds to the Android version you want to use.
Customize AVD Options: Configure additional options such as the name of the virtual device, the location where it will be stored, and other advanced settings. You can modify the device skin, enable or disable hardware features, and specify launch settings.
Finish Setup: Click on the "Finish" button to create the AVD. The AVD Manager will create the virtual device based on your selected configuration and system image.
Launch AVD: Once the AVD is created, you can select it from the AVD Manager and click on the "Play" button to launch the emulator. The AVD will start, and you can interact with it as if it were a real Android device.
Android Debug Bridge (ADB)
ADB stands for Android Debug Bridge. It is a command-line tool that comes bundled with the Android SDK (Software Development Kit). ADB enables communication between a computer and an Android device or emulator. It provides a set of commands that allow developers to interact with the device or emulator for various purposes, including debugging, installing apps, transferring files, and more.
Here are some key features and functionalities of ADB:
App Installation: ADB allows you to install APK files onto an Android device or emulator. This is useful for testing and deploying applications during the development process.
App Debugging: ADB provides debugging capabilities, allowing developers to connect to a device or emulator and debug their Android applications. It enables features like setting breakpoints, inspecting variables, and monitoring logs.
File Transfer: ADB allows you to transfer files between your computer and an Android device or emulator. You can push files from your computer to the device or pull files from the device to your computer.
Shell Access: ADB provides a shell interface that enables you to run commands directly on the connected device or emulator. This can be helpful for executing device-specific commands or performing advanced system operations.
Logcat Viewer: ADB allows you to view and monitor the log output generated by the Android system and your applications. This helps in debugging and troubleshooting issues.
Device Control: ADB provides various commands to control the behavior of the connected device or emulator. You can reboot the device, set screen properties, simulate phone calls, and more.
To use ADB, you need to have the Android SDK installed on your computer and the device or emulator connected via USB. ADB commands are executed through the command prompt or terminal.
Here are a few examples of commonly used ADB commands:
adb devices: Lists the connected devices or emulators.adb install <path_to_apk>: Installs an APK file onto the connected device or emulator.adb logcat: Displays the log output generated by the device or applications.adb push <local_path> <remote_path>: Transfers a file from the computer to the device.adb pull <remote_path> <local_path>: Transfers a file from the device to the computer.adb shell: Opens a shell on the connected device or emulator.
ADB is a powerful tool that assists in Android development and device management tasks. It provides developers with the ability to interact with devices and emulators efficiently, making it an essential part of the Android development toolkit.
Broadcast receivers in android
Broadcast in android is the system-wide events that can occur when the device starts, when a message is received on the device or when incoming calls are received, or when a device goes to airplane mode, etc. Broadcast Receivers are used to respond to these system-wide events. Broadcast Receivers allow us to register for the system and application events, and when that event happens, then the register receivers get notified. There are mainly two types of Broadcast Receivers:
- Static Broadcast Receivers: These types of Receivers are declared in the manifest file and works even if the app is closed.
- Dynamic Broadcast Receivers: These types of receivers work only if the app is active or minimized.
System wide generated intents used to receives broadcast
| Intent | Description of intent |
|---|---|
| android.intent.action.BATTERY_LOW : | Indicates low battery condition on the device. |
| android.intent.action.BOOT_COMPLETED : | This is broadcast once after the system has finished booting |
| android.intent.action.CALL : | To perform a call to someone specified by the data |
etc...
Creating a broadcast receiver
create
MyBroadCastReceiverclass and extends it withBroadCastReceiverclasspublic class MyBroadCastReceiver extends BroadcastReceiver { ... }Overrides the onReceive() method
 public  void onReceive(Context c, Intent i){
    ...
 }
Receives the broadcast event
     public void onReceive(Context c, Intent i) {
         String action = i.getAction();
         if (action.equals(Intent.ACTION_POWER_CONNECTED)) {
             Toast t = Toast.makeText(c, "Device plugged In", Toast.LENGTH_LONG);
             t.setGravity(Gravity.START, 0, 0);
             t.show();
         } else if (action.equals(Intent.ACTION_POWER_DISCONNECTED)) {
             Toast t = Toast.makeText(c, "Device plugged off", Toast.LENGTH_LONG);
             t.setGravity(Gravity.END, 0, 0);
             t.show();
         }
     }
Creates the class instance in the main class
MyBroadCastReceiver receiver = new MyBroadCastReceiver();Register the receiver with the event
 @Override
 protected void onCreate(Bundle savedInstanceState) {
     super.onCreate(savedInstanceState);
     setContentView(R.layout.activity_main);
     IntentFilter filter = new IntentFilter();
     filter.addAction(Intent.ACTION_POWER_CONNECTED);
     filter.addAction(Intent.ACTION_POWER_DISCONNECTED);
     registerReceiver(receiver,filter);
 }
Register receiver in manifest.xml file
     <receiver android:exported="true" android:name=".DevicePluggedInBroadCastReceiver">
        <intent-filter>
            <action android:name="android.intent.action.ACTION_POWER_CONNECTED"/>
            <action android:name="android.intent.action.ACTION_POWER_DISCONNECTED"/>
        </intent-filter>
     </receiver>
Unregister the receiver
@Override
protected void onStop() {
    super.onStop();
    unregisterReceiver(receiver);
}
Most important Thanks to
arshil
| Custom Menu | System Menu | |
|---|---|---|
| Definition | A custom menu created by the app | A system-wide menu provided by the Android system |
| Ownership | Owned and controlled by the app | Owned and controlled by the Android system |
| Customization | Fully customizable | Limited customization options |
| Purpose | Specific to the app's functionality | Provides system-level options and actions |
| Triggering | Typically triggered by user actions | Accessed through system UI (e.g., hardware button) |
| Availability | Only available within the app | Available across the entire Android system |
| App Integration | Integrated with the app's UI | Independent of any specific app |
| Use Cases | App-specific features and actions | Device settings, system-level controls, and options |
| Examples | Contextual actions in an app | Settings, notifications, volume controls, etc. |
The Custom menu is specific to the app and is designed to provide app-specific features, actions, or contextual options. It is fully customizable by the app developer and can be triggered based on user actions within the app's UI.
On the other hand, the System menu is a system-wide menu provided by the Android system. It includes options and controls that are not specific to any particular app but are available across the entire Android system. The System menu typically includes system settings, notifications, volume controls, and other system-level actions.
While the Custom menu is owned and controlled by the app itself, the System menu is owned and controlled by the Android system. As a result, the customization options for the System menu are limited compared to the Custom menu, which can be fully tailored to suit the app's needs.
It's important to note that the exact implementation and behavior of the Custom and System menus may vary based on the specific Android version, device manufacturer, and app design.
Intents in android
Android intent is the message that is passed between components such as activities, contents, content providers, broadcast receivers, services etc...
Android intents are mainly used to:
Start the serviceLaunch an activityDisplay a web pageDisplay a list of contactsBroadcast a messageDial a phone call etc.
There are mainly two types of intent
Implicit intent Implicit Intent doesn't specifiy the component. In such case, intent provides information of available ?components provided by the system that is to be invoked.
(je intent screen change krvama use no krvi ee implicit intent)
    // inside create method
    b = findViewById(R.id.btn);
    b.setOnClickListener(new View.OnClickListener() {
        @Override
        public void onClick(View view) {
            Intent in = new Intent(Intent.ACTION_VIEW);
            in.setData(Uri.parse("https://arshil.vercel.app"));
            startActivity(in);
        }
    });
Explicit intent Explicit Intent specifies the component. In such case, intent provides the external class to be invoked. (Shuddh ritna screen change krvama je intent use krvi ee explicit intent)
     b.setOnClickListener(new View.OnClickListener() {
        @Override
        public void onClick(View view) {
            Intent in = new Intent(MainActivity.this, SecondScreen.class);
            startActivity(in);
        }
    });
Difference between explicit and implicit intent
| Explicit Intents | Implicit Intents | |
|---|---|---|
| Definition | Intents that explicitly define the target component (activity, service, or broadcast receiver) to be invoked. | Intents that declare the desired action to be performed and let the system determine the appropriate component. |
| Target Component | Specifies the exact component to be invoked by specifying the class name or package name. | Does not specify the exact component, allowing the system to determine the appropriate component. |
| Use Case | Typically used when you know the target component and want to specifically launch it or communicate with it. | Used when you want to delegate the responsibility of handling the intent to any component capable of handling it. |
| Examples | Launching a specific activity, starting a specific service, or sending a broadcast to a specific receiver. | Opening a web page, sharing content, or capturing images using the default camera app. |
| Intent Creation | Intent intent = new Intent(context, TargetActivity.class); | Intent intent = new Intent(ACTION_NAME); |
| Intent Resolution | Resolves to a single component, based on the explicit information provided (class name or package name). | Resolves to multiple components capable of handling the specified action, as determined by the system. |
| Intent Filtering | Does not require intent filters in the manifest file of the target component. | Requires intent filters to be specified in the manifest file of the components that can handle the action. |
| Flexibility | Offers less flexibility as the target component needs to be explicitly defined. | Offers more flexibility as any suitable component capable of handling the action can respond to the intent. |
| Security Considerations | Explicit intents are considered more secure as they specify the exact target component. | Implicit intents may be vulnerable to component hijacking if not properly handled, as any compatible component can respond to the intent. |
Services in android
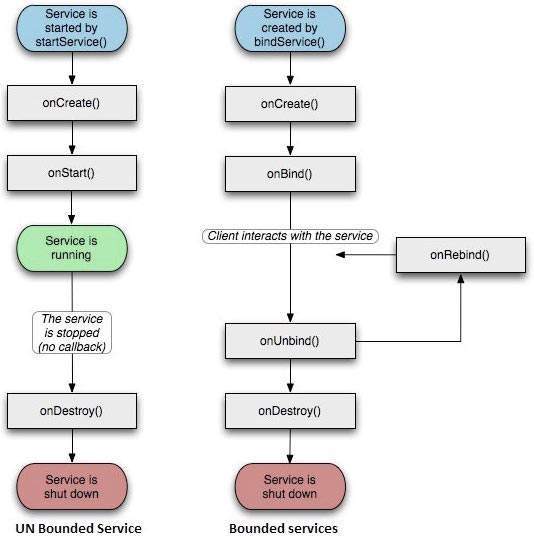
Services are the process which runs on background thread and have no GUI it can run even after application is destroyed.
There are mainly two types of services
- Bound service
- unbounded service
Bound service
- Bound Services:
- Bound services are services that allow other components (such as activities) to bind to them and establish a connection.
- Bound services provide a client-server interface, enabling components to interact with the service through method calls.
- They are typically used when multiple components need to interact with a service simultaneously or when the service needs to provide specific functionality on demand.
- Bound services have a closer relationship with the components that bind to them. When all the components unbind from the service, the service is automatically destroyed.
- Bound services are started and stopped using the
bindService()andunbindService()methods.
Unbound service
Unbound Services:
- Unbound services, also known as started services, are services that are started using the
startService()method without establishing a direct connection.- They can be used for tasks that need to run independently in the background, such as playing music, performing network operations, or handling long-running tasks.
- Once started, unbound services can continue running even if the component that started them is destroyed or unbound from the service.
- Unbound services are typically stopped using the
stopService()orstopSelf()methods.- Components can communicate with unbound services using intents and broadcasts, or by accessing the service through static methods or singletons.
Life cycle of services in android
Example of service
Create the
MyServiceclass which extendsserviceclasspublic class MyService extends Service { ... }
Implement the
IBindermethod if you want to create a BoundedService else perform your service task insideonStartCommand()methodprivate int counter = 0; @Override public int onStartCommand(Intent intent, int flags, int startId) { counter++; Toast.makeText(this, "Background service toast "+counter , Toast.LENGTH_SHORT).show(); return START_NOT_STICKY; } @Nullable @Override public IBinder onBind(Intent intent) { return null; }Start the service in
.MainActivityb = findViewById(R.id.serviceBtn); b.setOnClickListener(new View.OnClickListener() { @Override public void onClick(View view) { Intent in = new Intent(MainActivity.this,MyService.class); startService(in); Toast.makeText(MainActivity.this, "Service started", Toast.LENGTH_SHORT).show(); } });
Difference between bound and unbound services
| Bound Services | Unbound Services | |
|---|---|---|
| Connection | Establishes a direct connection between the service and clients. | No direct connection between the service and the components. |
| Interaction | Components interact with the service through method calls. | Components communicate with the service using intents/broadcasts. |
| Relationship | Close relationship with the binding components. | Independent of the components that started or bound to it. |
| Lifespan | Service is destroyed when all the components unbind from it. | Continues running even if the component that started it is destroyed. |
| Usage | Suitable when multiple components need simultaneous access. | Suitable for long-running background tasks or independent tasks. |
What is SQLite
sqlite is the local database used to store data in device.
Basics operation to be performed on SQLite
- Create
- Insert
- Update
- Delete
Operations on SQLite Database
// To create a database

SqLiteDatabase db = openOrCreateDatabase("name",MODE_PRIVATE,null);


// To start and end transactions

db.beginTransaction();
db.endTransaction();


// To delete quey

db.delete("table","Where clause",args);

// to delete database

db.deleteDatabase("name of db");


// Insert operation

db.insert("table",null,values);


// to perform raw query & query

db.query("Query",args);
db.rawQuery("SQL query",args);


// replace and update

db.replace("table",null,values);
db.update("Table",values,"where clause",args);
Read and insert database using SQliteOpenHelper class
MyDatabaseHelper.java
public class MyDatabaseHelper extends SQLiteOpenHelper {
    static final String DBName = "onePiece";
    static final int DBVersion = 1;

    private final Context c;

    public MyDatabaseHelper(Context c) {
        super(c, DBName, null, DBVersion);
        this.c = c;
    }

    @Override
    public void onCreate(SQLiteDatabase db) {
        String createQuery = "CREATE TABLE characters (id INTEGER PRIMARY KEY AUTOINCREMENT, name VARCHAR(50), love VARCHAR(50));";
        db.execSQL(createQuery);
        Toast.makeText(c, "Table created", Toast.LENGTH_SHORT).show();
    }

    @Override
    public void onUpgrade(SQLiteDatabase sqLiteDatabase, int i, int i1) {
        Toast.makeText(c, "On upgrade called", Toast.LENGTH_SHORT).show();
    }
}
Above file is used to perform essential db operations like creating, deleting tables and databases.
DBUtilsHelper.java
public class DBUtilsHelper {
    final private Context c;
    final private MyDatabaseHelper dbHelper;
    private SQLiteDatabase db;

    public DBUtilsHelper(Context c) {
        this.c = c;
        dbHelper = new MyDatabaseHelper(c);
    }
    public void openDatabase() {
        db = dbHelper.getWritableDatabase();
    }
    public void closeDatabase() {
        dbHelper.close();
    }
    public void insertData(String name, String love) {
        ContentValues val = new ContentValues();
        val.put("name", name);
        val.put("love", love);
        Toast.makeText(c, "Record inserted (name->" + name + ")(love -> " + love + ")", Toast.LENGTH_SHORT).show();
        db.insert("characters", null, val);
    }
    public Cursor getAllRecords() {
        return db.rawQuery("select * from characters", null);
    }
}
Above file is used to perform utilities operations on the database like inserting and fetching records
.MainActivity
    // Create the DBUtilsHelper instance

    DBUtilsHelper cs;

    // inside on create
    cs = new HandleCrudOperation(this);
    cs.openDatabase();


    // inserting data

    // inside button click
    et = findViewById(R.id.name);
    String name = et.getText().toString();
    et = findViewById(R.id.love);
    String love = et.getText().toString();

    cs.insertData(name, love);


    // Fetching data

     Cursor c = cs.getAllRecords();

        if (c != null && c.moveToFirst()) {
            do {
                int id = c.getInt(c.getColumnIndexOrThrow("id"));
                String name = c.getString(c.getColumnIndexOrThrow("name"));
                String love = c.getString(c.getColumnIndexOrThrow("love"));
                // perform operation with data...
            } while (c.moveToNext());
        }