

Leveraging the Beacon API for Asynchronous Requests
In modern web development, creating efficient and responsive user experiences often involves making asynchronous requests from the client to the server. Traditionally, this has been done using methods like XMLHttpRequest or the Fetch API. However, the Beacon API offers a unique approach, particularly suited for scenarios where the priority is to send data to the server without delaying the browser's unload or affecting the user experience.
What is the Beacon API?
The Beacon API is a part of the broader Web Beacons specification, designed to provide a way for the browser to send data to a web server asynchronously. It's particularly useful in situations where you want to send data to a server but don't need to wait for a response. The API is optimized for non-blocking requests, making it suitable for scenarios such as analytics tracking, logging, or performance monitoring.
Why Use Beacon?
The primary advantage of using the Beacon API is its non-blocking nature. When a page is being unloaded, traditional methods of sending data, such as XMLHttpRequest or Fetch, might be delayed or even canceled, leading to potential data loss. Beacon, on the other hand, ensures that the data is sent without affecting the user experience.
How to Use Beacon for Asynchronous Requests
Let's explore a simple example of using the Beacon API to send data from the client to the server asynchronously.
1. Checking Browser Support
Before using the Beacon API, it's essential to check whether the browser supports it. You can do this with a simple feature detection check:
if ("sendBeacon" in navigator) {
  // Beacon API is supported
} else {
  // Fallback to another method or inform the user
}
2. Sending Data
Assuming Beacon is supported, you can use it to send view count to the server:
// fire this function on initial page load
function sendCount() {
  const data = JSON.stringify({ page: "/", view: 20 });
  navigator.sendBeacon("/api/viewCount", data);
}
In this example, we're sending a simple page name and view count to a server endpoint. The navigator.sendBeacon method takes care of sending the data asynchronously.
Network inspection
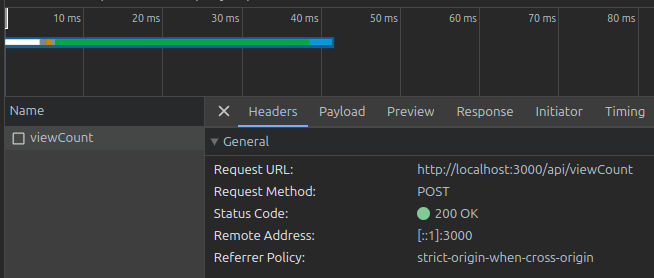
Data
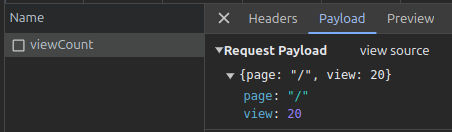
3. Handling the Request on the Server
On the server side, you need to handle the incoming requests. The specifics of this will depend on your server technology. Here's a hypothetical Next.js example using API route in App router:
export async function POST(req: Request) {
  const data = await JSON.parse(await req.text());
  const { page, view } = data;
  console.log(`Page - ${page}`);
  console.log(`View - ${view}`);

  // further process the data (e.g. store it in legacy table or collection)
  return new NextResponse(null); // returning null
}
Backend server log

4. Considerations and Best Practices
Data Format: Ensure that the data you send is in a format that your server can understand. In this example, we used JSON.
Error Handling: The Beacon API does not provide a way to handle errors or responses from the server. If you need confirmation that the data was received, consider using a fallback method like Fetch.
Security: Since Beacon is designed for non-blocking requests, it's crucial to consider security implications. Avoid sending sensitive or critical data via Beacon.
Conclusion
The Beacon API provides a convenient and efficient way to send non-blocking asynchronous requests from the client to the server. While it may not replace traditional methods in all scenarios, it's a valuable tool, particularly for tasks like analytics tracking or logging where the priority is to send data without delaying the user's experience. As with any technology, it's essential to understand its strengths and limitations and apply it judiciously based on the requirements of your application.